VISUAL BASIC
Unit 1:
Customizing of form writing simple program - Toolbox - Creating Controls - Name property - Command button - Access Key - Image Control - Text Boxes - Lables - Massage boxes - Grid - Editing tool - Variables - Data types - String - Numbers.
TOOLBOX:
The standard edition of Visual Basic comes with more than 20 different controls; The Proffional and Enterprise edition add many many more.
The tooxbox is usually located on the far left of the Visual Basic screen, but it need not be visible at all time. To open toolbox, use the Toolbx tool or got to the View menu and choose Toolbox(ALT+V+X). You can toolbox to another location.
CREATING CONTROLS:
You can always get a control on the form by double clicking on iits icon in the toolbox. This gves you the control in its default size and shape in the middle of the form. This is certainly one way to proceed.
You can use a combination of pointing,clicking,dragging to manipulate the toolbox.
1.Move the mouse pointer to the tool you want to use and click.
2.Move the mouse pointer to the form, Think of ths as the paont area in which you will draw the control.
3.Hold the mouse btton down and drag the mouse to create the object.
WORKING WITH A CONTROL ALREADY ON A FORM:
To work wth an existing control, you must first select it (remember the buzzword for this is"giving it the focus"). You do this by moviing the mouse pointer until it is inside the control and the clicking
RESIZNG AN EXSTING CONTROL:
- Use the Propeties window to adjust the Width and Height properties,or
- Work with the sizing handles(as dicussed next) .
USING THE DOUBLE CLICK SHORTCUT CREATNG CONTROLS:
Now that you konw how to move controls, You may prefer to use the double-click method to quickly create them. As you know,if you double click on any of the toolbox icons, the maching controls apperars in the center of the screen.
LOCKING CONTROLS:
You want to use Visual Basic locking feature, By choosing Formet|Lock Controls or the Lock Control tool from the toolbar, you can prevent yourself from iinadvertently moving a properly positioned control.
DELETING CONRTOLS:
You may end up with too many controls on your form especially f you use the double-click method a lot. To delete a control:
- Move the mouse pointer until it is inside the control, and click the left mouse button on select it
- Press DEl or OPEN the Edit menu and coose the Delete option by pressing ALT+E,D.
THE NAME (CONTROL NAME) PROPERTY
This property determines the name Vistual Basc uses for the event procedures you write to make the control respond to the user.
Height=5000
or
Me.Height =5000
Then Visual Basic will always assume you mean to change the height of the current form. ON the orther hand, if you wanted to change the height of a command button whose Name property is MyCommandButton,you must say:
MyCommandButton.Height=500
To make a form move left is a lot more confusing the writng to like ths:
Private Sub LeftButton_Click()
End Sub
The limits on a control names are the same as for form names:
- The name must begin with a letter.
- After that, you can use any combination of letters,digits,and underscores.
- The name cannot be longer than 40 characters.
Just as you use Properties window to customize the size and shape of blank forms, you can use it to customize controls. For Example, iif you dont like the default value for a controlls property, simply open the properties window and change it.
The next secton take you throughtt what are the most useful properties of command bottons.
OTHER USEFUL FOR COMMAND BUTTONS:
Command buttons have BackColor, Left, Top, Height, and Width properties. What follows is a shor discussion of the most basic ones.
VISIBLE: This property determines whether the command button is visible or not. Like the Visible property for forms, this property can only be set oto true or false.
ENABLED: This property determines whether the button can respond to any event whatoever. If you set this property to False, Visual Basic will not respond to any event concerning that button.
FONT: This property controls which font is used for is used the caption of the button. You can only use font at a time.
HEIGHT WIDTH: These properties define the height and width of the command button. The height and width properties for command buttons will also be mesured in inches.
LEFT, TOP: These properties determine the distance betweeb the command button and the left edge and top of the container.
MOUSEPOINTER: Setting the Mouse pointer the someting different then the usual arrow is a good way gve a user feedback that the she has moved the focus to the command button.
DISBLEDPICTURE, DOWNPICURE, PICTURE, STYLE: Visual Basic gives command buttons the ability to display graphcs.
To make a command button display a picture, you first need to ste the Style property to 1.After that, you need only specify the picture to be used as the value of the other three properties.
ACCESS KEYS:
Many Window applications allow pressng ALT and one other key, the access key, to quickly activate a control or a menu item.
Visual Basic makes it easy to set up an acccess key of any object that has a Caption property. When you set the caption, all you have to do is place an ampersand iin front of the letter you want to be access key. When the applicatiion is running, you can actiivate this button either by pressng the ALT+C combination or by clicking on the button.
IMAGE CONTROLS:
Image controls hold picture. They image control can be used display icons or picture created with a program such as Microsoft Paintbrush.
Image controls can be taken from the Traffic icon directory to substitue for the command buttons. You load a picture into an image controls by resetting the value of the picture property. If you choose the Picture property for the mage control, ths opens up a dialog box that let you choose image file to load.
TEXT BOXES:
Text boxes are the primary method for accepting input and displaying output in Visual Basic. Infact, printing too many lines of text to a form will often lead to a run-time error and, in any case, you can't scrool back through the form to see lines that may have slipped off the top.
SOME SPECIAL PROPERTIES FOR TEXT BOXES:
TEXT: The text property in text boxes is the analoag of the Caption property for a command button or a form; it controls the next the user sees.
ALIGNMENT: This property controls how text is displayed. THee default value is 0,which leaves the text left-algnment. Use a value of 1 and text is right -aligned. Use a value of 2 and text is centered.
MULTILINE: This property determins whethere a text box can accept more thaan one line of textt when the user runes the application. Visual Basic automatically word-wraps when a user type one line of information into multiline text box unless you've add horzontal scrolll bars a the text box.
The limit for a multilne text box is approximately 32,000 characters.
SCROLLBARS: This property determins whethere a text box has horizontal or vertical scroll bars.
BORDERSTYLE: As with the image controls, there are only two possible setting for the Borderstyle property fr a text box. The default value is 1, which gives you a single width border, called a fixed single. If you change the value oof this property to 0,the border disapperars.
PASSWORDCHAR: As you might expect from the name, the passwordchar property let you limit what the text box displayed. The convention is to uuse an asteisk(*) for the password character.
LOCKED: This True\false property lets you perrvent user from changng the contents or the text box.
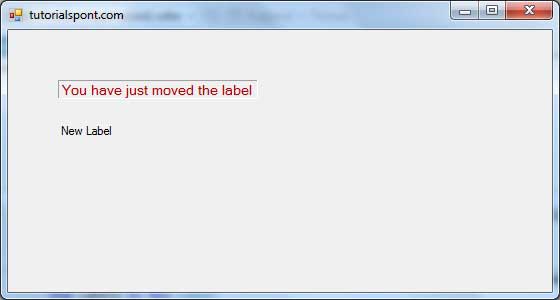
LABELS:
Use labels to display information you don't want the user to be able to change. Lables have 34 possible properties(30 are displayed in the properties window).
Lables have a caption property that determins what they display the Font being set via the Font property the Caption property is orginally set to be the same as the default name property.
As with command buttons, the Height, Width, Left, and Top properties use the scale determined by the surrounding container. The enabled property is not often used for lables.
USEFUL PROPERTIES FOR LABELS:
Alignment: The Alignment property for a lable has three possible settings. The usual(default) value is 0, which means the text in the lable is left-justified. Set the value of this property to 1, and the text inside the lable will be right-justified; Set value to 2, and the text is centered.
BorderStyle, BackStyle: The BorderStyle property has the same two possible values as textbox do. The difference is that the default value is 0, so lables do not start out with a border. Set the value to q, and the lable resembles a text box. The BackStyle property determines whther the lable is transparent or opaque.
AutoSize, WordWrap: Labels can be made to grow automatically in a horizontal direction to encompass the text you place in them. This is a funcion of the AutoSize property.
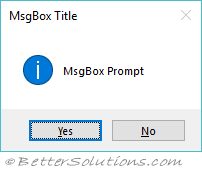
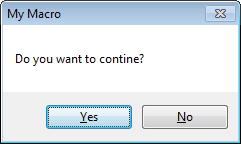
MESSAGE BOXES:
Message boxes display information in a dialog box superimposed on the form. They wait for the user to choose a button before returning to the application. User cannot switch to another form in your application as long as Visual Basic is displayed a message box.
Message box should be used for short messages or to give transient feedback.
SYNTAX:
MsgBox MessageInbox, TypeOfBox, TittleOfBox
To Dis
| Constant | Value | Description |
|---|---|---|
| vbOKOnly | 0 | Display OK button only. |
| vbOKCancel | 1 | Display OK and Cancel buttons. |
| vbAbortRetryIgnore | 2 | Display Abort, Retry, and Ignore buttons. |
| vbYesNoCancel | 3 | Display Yes, No, and Cancel buttons. |
| vbYesNo | 4 | Display Yes and No buttons. |
| vbRetryCancel | 5 | Display Retry and Cancel buttons. |
| vbCritical | 16 | Display Critical Message icon. |
| vbQuestion | 32 | Display Warning Query icon. |
| vbExclamation | 48 | Display Warning Message icon. |
| vbInformation | 64 | Display Information Message icon. |
For example the following statement:
MsgBox("Will have Yes and No buttons",vbYesNo)
THE GRID:-
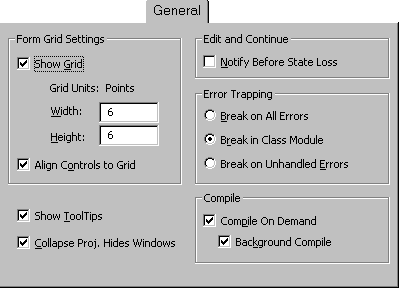
The grid is so important for accurately positioning controls, mastering it will help you give your applicaion a finished, professional look. In order to control the grid, choose ToolOptions(ALT+T,O) and then go the General page on the Options dialog box.
Show Grid: You can turn the grid on or off by changing the show Grid setting. The default setting is on. There is usually little reason to turn the grid off.
Grid Width, Grid Height Boxes: The Width and Height text boxed let you set the distance between grid marks. The default is 120twips. Change these both to 60, and grid become twice as fine.
Align Controls to Grid: The Align controls to Grid check box determins whethere controls automaticallyt move to the next grid mark or whethere they can be placed between grid marks. Usually you are better off changing the grid spacing to match your design requirements then turning this option off.
EDITING TOOL:-
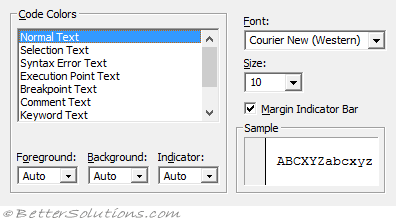
Good programming builds on code that is easy to read, and since version 5 of Visual Basic you have been able to control the size, font, and even the color or different pieces of your code.
All these features are controlled by the editor pages in the Option dialog bos one by one. Frist off, the Code Colors frame contains a list of the possible objects you can change.
The Editor Format Page:
Font List Box: Click on the down arrow in the font drop-down list box to see the complete list of fonts that your system know about. Choose another one by clicking on the font name when the list of dropped down.
Size List Box: You can type a point siz for the font directy in the size lit box or choose a size by clicking on the down arrow and the clicking on the size. This lets you change the font size if you are working with laptop or if you have trouble seeing smaller print.
Foreground, Background, and Indicator List Boxes: The three Code Colors boxes determine the foreground and background clolors used for each type of code as well as for the text used for indicatiors in the margin, such as bookmarks.
- Click on the code element you want to work with in the Code Colors list box
- Click on the arrow in thr Foreground drop-down list.
- Clifk on the color you like, and choose OK.
THE EDIT TOOLBAR:
Many useful editing features have button equivalents on the Edit toolbar.
 | List Properties / Methods - Displays a drop-down list in the code window that contains all the properties and methods available for the object that precedes the period (.). |
 | List Constants - Displays a drop-down list in the code window that contains all the constants that are valid choices for the property that precedes the equal sign (=). |
 | Quick Info - Provides the syntax for a variable, method, function or procedure based on the location of your position. |
 | Parameter Info - Displays a popup in the code window containing information about the parameters of the function in which the pointer is located. |
 | Complete Word - Accepts the characters that the editor has automatically appended as you were typing. |
 | Indent - Shifts all the lines (in the current block) to the next tab stop. No shortcut key by default but you could add one. |
 | Outdent - Shifts all the lines (in the current block) to the previous tab stop. No shortcut key by default but you could add one. |
 | Toggle Breakpoint - Toggles the insertion of a breakpoint at the current line. |
 | Comment Block - Adds the comment character ( ' ) to the beginning of each line in the current selection. |
 | UnComment Block - Removes the comment character ( ' ) from the beginning of each line in the current selection. |
 | Toggle Bookmark - Toggles the insertioon of a bookmark on or off for the active line. |
 | Next Bookmark - Moves the focus to the next bookmark in the bookmark stack. |
 | Previous Bookmark - Moves the focus to the previous bookmark in the bookmark stack. |
| Clear All Bookmarks - Removes all the breakpoints from the active project (or all projects ??). DATA TYPES:- Programmers use the word type as the buzzword for what might better be called flavor. Just as ice cream come in flavors, so too does data come in type. There are various kinds of numberic data types, the string data type, and even a Boolean data type. In fact, Visual Basic handles 14 standard types of data. String: The string data type hold charactrs. You can have a single character in a string or many. A variable holding a string is called, naturally enough, a string variable. One method of identifying variables of this type as to place a dollar sign($) at the end of the variable name: AStringVariables$. Integer: The long integer variable holds integers between -2,147,483,648 and +2,147,483,647. ALongIntegerVariables& = 123456789 Single Precision: The least accurate is called single precision. The have decimal point, but you can sure of the accuracy of only seven digits. 12,345,678,97, the 8,97 ,ay not be accurate. The answer could just as well be 12,345,670,01 Although the accuracy is limited, the size (range) of these number os up to 38 digits. ASinglePrecisionVariable!=12.345 Double Precision: The double precision data type is used when you need number with up to 16 placed of accuracy; they also allow you more than 3000 digits, Calculation are also approximate for these variable. You can rely only on the first 1`6 digits. ADoublePrecisionVariable#=12.345# then VB assumes you mean 12.34500000000000 Date: The date data type give you a convenient way to store both date and time information for time between midnight on january 1,100,to midnight on December 31,9999. You need top surround any assignment to date variable with two #'s for example: Millennium=#January 1`,2000# Millennium=#Jan 1,2000# Millenium=#1/1/2000# Byte: The byte type was added to Visual basic 5; It can hold integers between 0and 255. it is also needed for handling binary files in versions of Visual Basic after version5. Boolean: Use the boolean type when you need data to be either Ture or False. It considered goog programming pratice to use this data type rather than integer for Ture/False values. Variant: The variant data type was added to Visual Basic way back in version 2. The variant data type is designed to store all the different possible Visul Basic data received in one place. IT doesn't matter whethere ther information is numeric, date/time, or string; the variant type can hold it all.
*********ALL THE BEST******
|